- Admin
After you have created the Admin and User roles in myBusiness (refer to Help Centre - Using myBusiness), you can login as Admin to Second CRM and further refine the roles and permissions for the users created as Staff.
End users have a limited access to the CRM system to perform actions like Create, Retrieve, Update, and Search) and limited user specific customization operations.
Administrator users are capable to manage the complete software including:
- managing users and groups and their access privileges,
- customizing the CRM user interface,
- creating communications templates,
- configuring all organization-wide settings,
- changing passwords, deactivating users, and viewing the login history, and
- exercise actions for all data.
Note: Normally the first user you will create will be assigned as Admin for the CRM System.

Roles
Default role to end user will be staff with limited access to the CRM system.

At this menu you are offered to add, edit, delete or move roles. Move your computer mouse pointer over a role entry. You will see a set of icons that allows you to perform these operations.
The "Add" function creates a new role which is located in the hierarchical order one level below an existing role. You have to give the role a unique name and you can decide which profiles will be associated with a particular role.

Changing Roles for Non-Admin
For users created users in the Singtel myBusiness portal, with End User as the role, Second CRM assigns the 'Staff', which gives them limited access. As Admin user, you can change the roles for those users to higher roles at any time as needed. The default roles available in Second CRM are:
- Management: Can access all modules and Reports in Read Only mode, but cannot enter information.
- Manager: Can access all CRM modules, other than admin settings, with full rights, including delete and export data. They can also oversee information entered by Staff.
- Staff: Can access all CRM modules, other than admin settings, without rights to delete records and export data.
For example, you want to change the role from 'Staff' to 'Manager'. First, click on 'Settings' field and go to 'Users' like shown below:

After you have clicked on 'Users', you'll see the list of all the users that you've created, along with their assigned Roles and whether they are with Admin role or not.

To change role for particular user, click on the user name and then click 'Edit' button.

Click on + sign next to the Role and Select the required 'Manager' role.

After all changes has been made, remember to click 'Save' to avoid missing information on changes.
The user now will have Role as Manager.

Profiles
Profiles are used to define the user privileges to access, change or delete data in Second CRM. Normally each role will be associated with one profile, but it is also possible to configure one role with multiple profiles, to manage the situation, where, 2 staffs have same role but having different permission in CRM.
Click the Profiles menu to open the list view of your profiles as shown below. Here you see a list of all profiles that have been defined in your CRM system. The CRM system comes with a set of pre-defined profiles which you can use and change but not delete.

Click the name of a profile to see the details. The privilege setting terms have already been explained in section: Definition of Profiles. You may change the profile by clicking the [Edit] button.
To create a new profile click the [New Profile] button at the list view. Insert the name and select administrator as base profile.

Once you have created profile select privileges for it. Here you can select whether you want this role should have access to create/edit/view/delete and save it.

By default the sharing access settings allow all users to use all CRM features if not limited by profiles. In most cases there is no need to change this. However, if necessary you can restrict the access to individual modules within your organization.
Go to the Sharing Access menu to get an overview about the settings. The CRM system comes with default Global Access Privileges for the most important CRM modules. These privileges control the data sharing at organization level.

Private: Only the record owner, and users with a role which is above that of the record owner's role in the hierarchy, can browse, edit, delete and report on those records. That means by default a specific user can view only the data sets that are owned by the user, owned by a group where the user is a member, owned by subordinate users, or shared to the user.
Public: Read Only All users can view and report on records but not edit them. Only the owner, and users with a role which is above that of the record owner's role in the hierarchy, can edit or delete those records.
Public Read/Write: All users can view, edit and delete all records.
Layout manager is all about customizing the Second CRM fields and its picklist items. For example you with you add new field in accounts module. Come to accounts list view>click accounts setting and select layout editor.

Below is the screen for layout editor where you can add/hide fields, add/blocks and even move field from on block to the other.

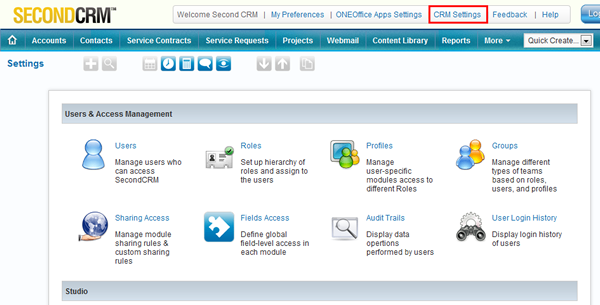
To setup or add any information in your CRM account, you need to click on Settings module on the top of module bar.
![]()
Then, the 'Settings' menu will appear just like below:
In this section/portion, Second CRM admin can add or edit any information related to your CRM account for example, Users, Profiles, E-mail Templates and etc.
Company details will appear in any document you send out to your customers, for example, you send out quotes or invoice to new prospects, company details are needed so that they know to whom and where to refer and make payment.
To add or edit your company details in your Second CRM account, just click the 'Settings' module like shown before and once the menu appears, click 'Company Details.'

CRM user will view below screen> click sample company details or create new.

Once user click first sample company details, below screen will appear, click Edit and update data with your company details then save it.

To set up your outgoing mail server, just click the 'Settings' module like before and scroll down to 'Other Settings' section. You can click on 'Outgoing Server' module.

After you have clicked 'Outgoing Server' module, the screen will appears like below where you can enter all information needed to set up outgoing mail server.

To set up on incoming mail server, it must be done by every user you have in your Second CRM account as it will require the user name, password and email id for each user.
To set up your incoming mail server, click 'My Home Page' module on the module bar and choose 'Webmail'.

After that, once the screen has appears like below, click on 'Incoming Mail Server Settings' to set up for your incoming mail server.

'Incoming Mail Server Settings', your screen will appears like below and you now can enter all the information required to ensure your incoming mail server runs smoothly. Once you done with entering, always be sure that you click 'Save' to avoid in missing information.

Each CRM user can create inbox to view emails and reply. This helps to maintain customer mails at centralized system and can be accessed without going to another window for outlook or mail server.
|
Mail Server Name or IP |
: |
imap.gmail.com or mail.secondcrm.com |
|
Username |
: |
gmail_id or support@secondcrm.com |
|
Password |
: |
gmail_password |
|
Refresh Timeout |
: |
1 min |
Below are the steps to configure ONEOffice and access your inbox from Second CRM. If you know your ONEOffice password, proceed to Step 5 directly. If not, follow the steps below.
- In your ONEOffice Mail page, click Mail Settings.

- Under Accounts tab, click Google Account Settings.S

- Click change password.

- Create new password.

- In your Second CRM Home page, click Webmail then Incoming Mail Server Settings. Insert your ONEOffice user name and password then save it.

NOTE: User can view ONEOffice (Gmail) inbox under webmail sub-panel "My Mails".
In Second CRM, you can create several workflows.
An example of this is sending reminders to your customers once their account is about to expire or need renewal. To set for this reminder to pop out, you can click on 'Settings' module in the module bar and your screen will appear like below:
![]()
As you entered 'Settings' menu, scroll down until you see 'Other Settings' section and 'Workflows' module there.

In 'Workflows' module, you can create any types of workflow you wish to have in your CRM related to any of your customers. To set up for new 'Workflows', you will see screen like shown below:

To create new workflow, once you have clicked 'New Workflow' module, there will be small pop out appears on your screen which you can choose directly what type of module you want to create for the workflow. For Expiry Notification of Customer Contracts, Select 'Service Contract' in the Popup window.

Then, the screen will appear for you to set the details about the workflow, the steps and the condition attached to the workflow.
- When to run the Workflow

- On What Condition

Once done with entering information, remember to click 'Save'. After that you can Add Task or Action that are to be performed, upon meeting the set Conditions.

Depending upon what Task you selected, there will be extra options for you to configure, as show below for 'Create To Do":

Import Contacts
- Click the Import Icon at the Tool tab as shown below.

![]() Important
Important
You can only use the export and import tools if they have been enabled by Second CRM administrator.
![]() Note
Note
Second CRM is using a character set which is UTF-8 (Unicode compatible) coded. Unicode is an industry standard allowing computers to consistently represent and manipulate text expressed in any of the world's writing systems.
The following section describes the import and export function for contacts. If you want to import or export accounts or other modules, you can use this description accordingly.
Prepare Data for Import
Before you can import data you have to format these data in order to meet the Second CRM's requirements. The first requirement is that the data must be presented in the ASCII format with comma separated values (CSV) and UTF-8 or ISO-ISO-8859-1 coded character sets. The CSV file format is often used to exchange data between different database applications. Your file must have the extension csv with lower-case letters. Since a common standard for the CSV format does not exist, your data sets must be formatted according to the following rules:
- All fields are separated by commas or semicolons and must be individually wrapped by double-quote characters. The separator symbol may get defined by the delimiter parameter during the step 1 imports.
- All data sets must include the mandatory fields (e.g. Last Name and Company for leads).
- All data sets must include values for picklists (use --None-- if you do not have a value).
- Fields that contain embedded line-breaks or fields with leading or trailing spaces are not allowed.
- Number fields have to contain numbers only without "." or "," characters (for instance, use 3800 instead of 3,800).
- Fields that contain double quote characters should be avoided. If you have to use them, they must be surrounded by double-quotes, and the embedded double-quotes must each be represented by a pair of consecutive double quotes.
- The first record in your file may be a header record containing column (field) names. It is recommended to use a header but if you don't you may remove the header check during the imports step 1.
- Dates must be imported in the following format: year-month-day hour:minute:second, for example: "2008-01-07 00:00:00"
- Entries for Multi-Select Combo Boxes must be separated by a |##| character string, for example: "America |##| Europe"
- Check boxes must be imported in the following format: 1 for yes, 0 for no
The following is a sample file for lead imports. Each line represents a data set.
"Company","Street","City","PostalCode","Country","Phone","Lastname", "Sample Inc.","123 Samplestreet","Scity","12345","USA","(123)123-4567","Miller", "XYZ Inc.","Main Street 33","Xcity","5555","Germany","","Brown"
![]() Important
Important
If you do not have all a full set of data available, you must wrap an empty entry by double-quote characters as it can be seen in the figure above for the missing telephone number in line 3. If you have data sets which do not have all mandatory fields included, these data sets will be ignored during an import.
The second requirement is that you have to include all custom fields with your import if you have created such fields before. In case you do not have content for the custom fields you may leave the field in your data list empty but you must import it. If you do not import these fields, the status of these fields in your CRM's database remains undefined and you cannot use such fields for filter functions.
- Select the file you want to import.

Because of possible timeouts with the Second CRM it is suggested not to import more than 499 customer contacts with a single import operation. (Your administrator may change this number.) If you have to import more data, you need to split your files before import and repeat the import operation. All the data you intend to import must contain the mandatory fields as they are marked by a [*] sign at the contacts edit view.
- Specify Format

- Check duplicate record
This is an optional step, which allows the user to configure duplicate record handling during Import. User can configure the criteria, for duplicate records look up and can also configure the action to be taken when duplicate records are found.

If you import contacts with account information, the import will generate contact and account entries which refer to each other. During an import the Second CRM checks whether the contacts account name already exists. If it does, it will link the imported contact to the existing account automatically. Therefore, it is recommended to import accounts first.
- Mapping of fields.
At this site you have to link your data with the according CRM fields. You see the standard fields as they are offered by the Second CRM, and your custom fields if you have created them beforehand. It is not necessary that you to create references for all data types in your file, but you must link the mandatory fields. In the illustration you can see sample entries.

If you have to make multiple imports, the Second CRM offers you to store the references you have selected for future use. Mark the check box [Save as Custom Mapping] and write a name of this reference into the entry field. Make sure that this name has not been used before. This Custom Mapping will be available at step 2 as Use Saved Mapping when you make the next import.
When you have set all references, you can check the Duplicate Merging checkbox if you want to enable duplicate merging. Click [Import Now] to transfer your data to the data base.
If you import contacts with account information, the import will generate contact and account entries which refer to each other. During an import the Second CRM checks whether the contacts account name already exists. If it does, it will link the imported contact to the existing account automatically. Therefore, it is recommended to import accounts first.
Modifying and Creating Reports
Second CRM allows you to get a report for almost any data you have stored in your CRM at the Tools, click Reports
menu.

The Second CRM offers you a report generator as well as a report designer.
- Report Generator - The report generator provides you with reports which you can see at the screen or export as
PDF or Excel files. - Report Designer - The report designer allows you to select the data you want to see in a report and to modify
their representation.
The Second CRM comes with a rich selection of standard reports as illustrated in the previous figure.
Each of these reports comes as two types:
- Tabular Report - Tabular reports are the simplest and fastest way to get a listing of your data.
- Summary Report - Summary reports allow you to view your data along with subtotals and other summary
information.
- Edit Report
To change an existing report, click the Report Name. A new window will open which list the selected report and
allow customizing it.

- Create New Report
To create a new report, click the New Reports icon. First you will be asked for the Second CRM module which provides the data for the report. Based on this selection the fields available for the reports are selected by Second CRM.

The opening pop up window displays the next steps for report creation as shown below.

Follow the instructions.
![]() Caution
Caution
At the current release, the Second CRM does not monitor the available site space for a proper PDF to be created. If you chose too many columns, you might not get a useful PDF export.
![]() Note
Note
Designing a report can be a very complex task. You should start with a very simple report and frequently check your results before beginning to use filter functions.
If your report design is finished, click [Next] to save your settings and to start the report generator. Then you
- can see the report at your screen,
- may export the report as PDF or Excel file, and
- may print the report.
Example: Let's assume you want to have a list of accounts who bought a specific product
You should follow these steps to create a report:
- create a new report with a name, report folder and description
- you will be asked for the related module; select Products
- you will be asked for the format of the report; make your choice
- select the fields you want have in the report
- select the field in advanced filter as Product Name - equals - [name of your product]
- Customized Report Folders
To create your own report folder, click the [Create New Folder] link. In the new pop up window, you may give this folder a name and a description.

Click [Save] to create this folder. You could use this folder to store your own or modified reports. The new folder will be listed at the Tools > Reports menu.
At the Tools > Reports menu you may also move or delete reports by clicking at the appropriate buttons or icons.
![]() Note
Note
You may create any report to be listed in your own folders. Select your folder in step 1 of the new report creation process.
- Managing Currencies
Click [Currency Configuration] to set your system-wide currencies. You may add an unlimited number of currencies, by clicking the [New Currency] button.

You may also delete or edit exiting currencies by clicking the appropriate icons.
For new currencies you will have to provide the following information:

Table 1. Currency Information
| Type | Content |
| Currency Name: | The name of the currency, e.g. US Dollar. |
| Currency Code: | The short name of the currency, e.g. Dollar. |
| Currency Symbol: | Enter the symbol of the currency. This symbol will be used at the Second CRM for all price information, e.g. $. |
| Conversion Rate: | Enter the currency conversion rate in relation to the Second CRM basic currency. The basic currency is the first currency at your currency list. |
| Status: | You may set a currency as active or inactive. Inactive currencies cannot get assigned to users as described in section: User Management. |
Click [Save] to transfer your currency settings to Second CRM.
- Configuring Taxes
In all phases of the sales process, Second CRM considers all type of taxes which may apply to the sales of products or services. That may include local, state or federal taxes as well as special taxes. These taxes can be calculated individually for each product or service to be sold, or may be calculated for the whole. Second CRM may include taxes when calculating prices for quotes, orders or invoices. To change the settings of the existing taxes, click the [Edit] Button at the Tax Calculations menu as shown below.


To add new taxes use the Add Tax button. You might define as many additional taxes as you need. Enter your taxes in percent (%). Note that you cannot delete the default taxes as they are provided with Second CRM. However, you may deactivate not needed taxes by clicking the appropriate check box.
Click [Save] to transfer your tax settings to Second CRM.
- Email Templates
If you use the Second CRM for sending standard e-mails frequently it is most helpful to have such e-mails available as template. To see any existing e-mail template list, click the E-mail Templates menu. The Second CRM comes with templates. You may modify existing templates or create an unlimited number of new templates. Note that there are public and private templates. Public templates are available to all CRM users. Private templates are only used by particular users.


Click on the name of a template to see the detail view of an existing template. Note the merge field values highlighted in this illustration. Merge field values are used to dynamically include data from your CRM into the mail. In this example mail, the merge field value $contacts_firstname$ represents the first name of a contact. The other merge field values are related to the user who sends the e-mail.

You may include dynamic merge fields into your template at the edit view. The merge field dialog supports you for defining the merge field syntax. Use the copy and paste to enter the field codes. You must fill in all mandatory fields.
All e-mails are sent in the HTML format. You may use the HTML editor functions to design a special layout. You may also include HTML code which has been created by an external editor. But be careful and test your results, not all HTML code options are supported.

![]() Tip
Tip
You may clone templates. Edit an existing template and store it under a different name.
Click [Save] to transfer your template to Second CRM.
- Modify Picklist Values
Picklist Editor
Picklists are drop down menus which are offered to you at the edit or ajax view of several CRM modules. This menu allows you to define the content of the pick lists based on the roles. Click the Picklist Editor menu to get an overview about the Second CRM modules which have pick lists included.

The content of the pick list for each individual (non admin) user depends on the role which has been assigned. You may use this feature for instance to create pick lists in different languages or to restrict the users access to certain entries.
To modify the pick list content, select a role first and choose a corresponding CRM module. The display of the available pick lists will change accordingly. (Note that after a fresh installation all entries for all roles are equal.) To change the content of a pick list click [Edit]. At the new window which pops up you may make your changes. You may change the applying role while you are in the edit view. If you want to modify the same pick list for another role just hit the [Select the parent role] button and switch to another role.
![]() Important
Important
Some content of the pick lists cannot be changed. This content is defined by the system settings. Please contact us if the offered content does not fit your needs.
![]() Note
Note
At the edit and detail view of the Second CRM modules the content of the pick lists is displayed in alphabetical order. A user with admin privileges always sees all picklist entries, independent of its role assignment. If a pick list entry has been assigned that is not accessible by the role of the current user a message "not accessible" will be displayed.
- Field Access
The function available at the default organization Field Access menu is used to control the visibility of fields in various modules for the entire organization. You can use this function to either show or hide entry fields to the entire organization.
By default the Second CRM is configured as to display all master data which are provided in Second CRM. As an example below, you'll see the default fields for the calendar. If you want to restrict access to specific fields, you can edit and change the settings for each individual CRM module.

![]() Tip
Tip
Default field access settings include custom fields you may have created before. Default field privileges can be defined for the following modules: Leads, Accounts, Contacts, Potentials, Calendar, Trouble Tickets, FAQ, Price Books, Purchase Order, Invoice, Notes, Emails, Products, Vendors, Quotes, and Sales Orders.
![]() Important
Important
Please note the following rules:
It is not possible to disable the mandatory fields in the modules. Default Organization field access overrides the profile level field access. For example, let us assume a profile allows viewing the website field in leads. However, if this field has not been enabled at the organization level field access settings it will not be displayed.
- Terms and Conditions
Terms and Conditions portion is the part where mention your business terms and conditions for example in the quotes or invoice. It is set as template so that you do not need to type or key in for every time you want to create new quotes or invoices. You can just select it from the list you made.
Click 'Settings' module and go to 'Other Settings' which is located at the very bottom part of page. You will see 'Inventory: Terms and Conditions' section. You can create your own Terms and Conditions and it will be available as default entries whenever you create a new quote, order or invoice.

